admin
05 Mar 2026
Digipaks
Your Complete Guide to Creating CDs in Digipaks
Choosing CDs in digipaks instead of the old-school jewel case is about making a statement. It tells your fans you care about quality and are offering them something more than just a disc—you’re giving them a premium, eco-friendly piece of art. Digipaks have a tactile, high-end feel, almost like a mini vinyl sleeve, giving you way more space for artwork and creating a collectible that deepens that fan connection.
Why Digipaks Are the Professional Choice for CDs
When you decide to release physical music, the packaging is the very first thing a fan sees and touches. It’s the visual handshake for your sound. While the classic plastic jewel case did its job for decades, the digipak has become the go-to for artists who want to deliver something more substantial and visually striking.
The real appeal of CDs in digipaks is how they’re built. They’re made from printed paperboard or card stock, folding out like a wallet to hold the CD on a clear plastic tray. This design immediately bumps up the perceived value of your album.
The Visual and Tactile Advantage
Forget the tiny, cramped insert of a jewel case. A digipak gives you a broad, continuous canvas for your vision. A standard 4-panel digipak offers four distinct surfaces for high-res graphics, lyrics, credits, and photos, letting you tell a much richer story. All that extra real estate turns your CD into a legitimate piece of art, encouraging fans to dive into the whole package, not just pop in the disc.
How it feels in your hands matters, too. The smooth matte or vibrant gloss finish on card stock feels way more personal and crafted than cold, brittle plastic. For fans, this creates a stronger bond with the music and you, the artist. It feels less like a disposable container and more like a cherished keepsake.
An Eco-Conscious Packaging Solution
In a world where sustainability is a big deal for a lot of people, the green benefits of digipaks are a huge plus. They first started catching on in the mid-90s as a smarter, greener alternative to plastic. Because they’re mostly paperboard, they slash plastic use by as much as 75% compared to a traditional jewel case. That resonated with major labels and environmentally-aware artists alike. You can explore more about the CD market’s evolution and see how these packaging shifts made a real difference.
For an independent artist, a digipak screams professionalism and a commitment to quality. It signals that you’ve invested in every single detail of your release, from the audio mastering right down to the final presentation on your merch table.
Choosing a digipak isn’t just a packaging decision; it’s a branding move. It aligns your physical product with a higher standard of quality and care. Whether you’re creating a special edition release, a promotional item for the press, or your debut album, the digipak makes an immediate and lasting impression that a standard jewel case just can’t compete with.
Digipak vs Jewel Case: A Quick Comparison
Deciding between a Digipak and a standard Jewel Case can feel like a tough choice, but it really comes down to the kind of impression you want to make. This table breaks down the key differences to help you figure out what’s best for your project.
| Feature | Digipak | Standard Jewel Case |
|---|---|---|
| Material | Printed card stock with a plastic tray | All-plastic (polystyrene) |
| Durability | Resilient to drops, won’t crack | Prone to cracking and broken hinges |
| Artwork Space | Expansive, multi-panel canvas | Limited to a small front/back insert |
| Eco-Friendliness | Uses up to 75% less plastic | High plastic content, less recyclable |
| Perceived Value | Premium, high-end, collectible feel | Standard, functional, mass-produced feel |
| Weight | Lighter, reducing shipping costs | Heavier and bulkier |
Ultimately, if you’re aiming for a premium, art-focused release that stands out, the Digipak is your winner. But if budget and classic functionality are your top priorities, the jewel case is still a solid, traditional option.
Getting Your Artwork and Audio Files Print Ready
Before your CDs in digipaks can hit the press, your creative vision needs to be translated into technically perfect files. This is the crucial pre-production stage where a little bit of prep work now saves you from major headaches later—think printing errors, weird color shifts, or audio glitches. Getting it right ensures a flawless final product.
The first thing to tackle is your artwork. Your manufacturer will give you a dieline template, which is basically the blueprint for your digipak. Don’t think of it as a suggestion; it’s a critical guide showing exactly where to place every piece of your design, accounting for every fold, cut, and glued panel.
Think of the dieline as the skeleton of your digipak. You’ll layer your art right on top, making sure every element lands exactly where it should. A common mistake is ignoring these lines, which can lead to text being trimmed off or images wrapping awkwardly around a spine.
Artwork Technical Specifications
To avoid a final product that just doesn’t look right, your files have to meet professional printing standards. These aren’t arbitrary rules; they’re in place to make sure the physical digipak looks just as good as the design on your screen.
Here are the non-negotiable specs you need to follow:
- Color Mode: Your files must be set to CMYK (Cyan, Magenta, Yellow, Key/Black). Your computer screen uses RGB (Red, Green, Blue), which has a much wider range of colors. If you send in RGB files, the colors on your printed digipak will likely look dull or completely different from what you expected.
- Resolution: Every image needs to be at least 300 DPI (dots per inch). Anything lower will come out blurry or pixelated, which instantly makes your project look amateur.
- Bleed: You have to extend your background artwork about 1/8 inch (3mm) past the dieline’s trim edges. This “bleed” is a safety margin that ensures no ugly white edges show up if the cutting blade is off by even a fraction of a millimeter.
Preparing Your Master Audio
Just like your artwork, your audio has to be production-ready. You can’t just send over a folder of unmastered MP3s and hope for the best. For professional CD replication, your audio needs to be specifically prepared to avoid any clicks, pops, or messed-up track sequencing.
A dedicated CD master is essential. It’s not the same as a master prepared for streaming services. The mastering engineer will ensure proper levels, spacing between tracks, and embed metadata like track titles and artist info.
You’ve got two main options for submitting your master audio:
- DDP (Disc Description Protocol) Image: This is the gold standard in the industry. A DDP is a complete digital clone of your final CD, containing all audio data, track markers, and metadata bundled into one neat folder. It’s the most reliable way to deliver your master because it leaves zero room for error.
- Sequenced WAV Files: If you can’t get a DDP, you can provide individual WAV files for each track. They must be named and numbered in the correct order (e.g., 01_Track_One.wav, 02_Track_Two.wav) and be at CD quality, which is 16-bit, 44.1 kHz.
Taking the time to get these details right is the single most important investment you can make in your project. It’s what separates a professional release from a costly mistake. For a deeper look into what happens next, you can learn more about how CDs are made with Mixtape Duplication.
Picking the Right Materials and Finishes
The materials and finishes you choose are what really bring your digipak to life. This is the stuff that separates a decent release from a truly memorable one, turning a simple disc holder into a piece of art that feels special in someone’s hands. These choices shape how fans experience your music before they even press play.
The heart of any digipak is its paperboard stock. This isn’t just cardboard—the weight and texture give your project its durability and overall vibe. You’ve got a few options, and each one tells a slightly different story.
Paperboard Stocks: The Foundation of Your Digipak
Choosing the right stock is all about matching the physical package to your artistic identity. Think about the mood of your music and how the packaging can echo that.
- Standard Recycled Stock: This is a solid, go-to choice that’s both cost-effective and eco-friendly. It provides a great base for vibrant printing, making it a reliable option for just about any genre.
- Premium Uncoated Paper: If you’re going for a more organic or earthy feel, uncoated stock is perfect. It has a slightly textured, natural finish that absorbs ink in a way that gives colors a softer, more subtle look. This is a fantastic match for folk, acoustic, or indie artists wanting something that feels raw and authentic.
- Heavy-Duty Board: Planning a deluxe edition or just want your digipak to feel extra substantial? A heavier board adds weight and rigidity, giving it a premium feel from the moment someone picks it up.
The high-quality feel of CDs in digipaks has a real impact, especially in places that still love physical media. Take Germany, for instance, where CDs are expected to make up 11.3% of the music market in 2025. Digipaks are a huge part of that, accounting for over 40% of new releases because they feel so collectible. It just goes to show how great packaging keeps physical formats alive and well. You can see more about European CD sales trends on Accio.com.
Printing Finishes: Adding That Final Pop
Once you’ve got your stock picked out, the finish is what adds that last layer of personality. It not only protects your artwork but also completely changes its visual impact.
A glossy UV coating is like putting a sheet of glass over your art. It makes colors super vibrant and gives images a high-impact, almost-wet look. A synth-pop band might go for a high-gloss finish to make their neon cover art explode with color.
On the flip side, a matte finish is your best bet for a more understated, sophisticated feel. It’s smooth and non-reflective, which feels modern and elegant. It’s less about flash and more about a cool, tactile experience—perfect for an artist aiming for a refined look.
You can even get creative and mix them. With Spot UV, you can add a glossy coat to specific parts of the design—like your band logo or the album title—while keeping the background matte. This contrast creates a really cool visual and textural effect that makes the important details stand out. Ultimately, these are the choices that give your music its physical identity.
Inside the CD Manufacturing Process
Once you’ve handed off your final artwork and audio files, your project leaves the creative world and enters the factory floor. Knowing a little about how your CDs in digipaks are actually made can help you pick the right process for your budget, timeline, and how many copies you need. The two main paths are duplication and replication, and they’re built for very different scenarios.
Duplication is the fast and flexible choice for smaller projects. You can think of it as professional-grade CD burning, where your data is written onto high-quality, blank CD-Rs using automated machines. This is perfect for indie artists who need a quick batch of CDs for a tour or a special release.
Replication, on the other hand, is the full-scale, industry-standard method for big runs. It’s a much more involved process that starts with creating a “glass master” from your audio. That master is then used to create a metal stamper, which physically presses your music into molten polycarbonate, creating the discs from scratch.
Duplication: For Small Batches and Quick Turnarounds
If you’re pressing fewer than 500 units, duplication is almost always your best bet. It’s the go-to for artists who want to test the waters with a new album or just need CDs in hand for an upcoming show without a long wait.
- Best For: Orders of 50 to 500 units.
- Turnaround Time: Usually around 5-10 business days.
- Cost: The per-unit cost is higher, but there’s no big upfront investment.
The real win here is flexibility. You can order a small run without getting stuck with boxes of unsold discs, making it a low-risk way to get professional-looking CDs to your fans.
Replication: The Pro Standard for Bulk Orders
When you’re ready to go big (500 units or more), replication is the most professional and cost-effective route. It takes a bit longer because of the glass mastering step, but the price per CD drops dramatically as your order size goes up. Replicated discs are also considered the highest quality and are the standard for any release you’d find in a retail store.
The core difference is simple: duplication burns your data onto a disc, while replication stamps the data into the disc itself as it’s being made. This makes replicated CDs incredibly durable and reliable for the long haul.
This infographic breaks down the common finishes applied during the digipak printing stage.
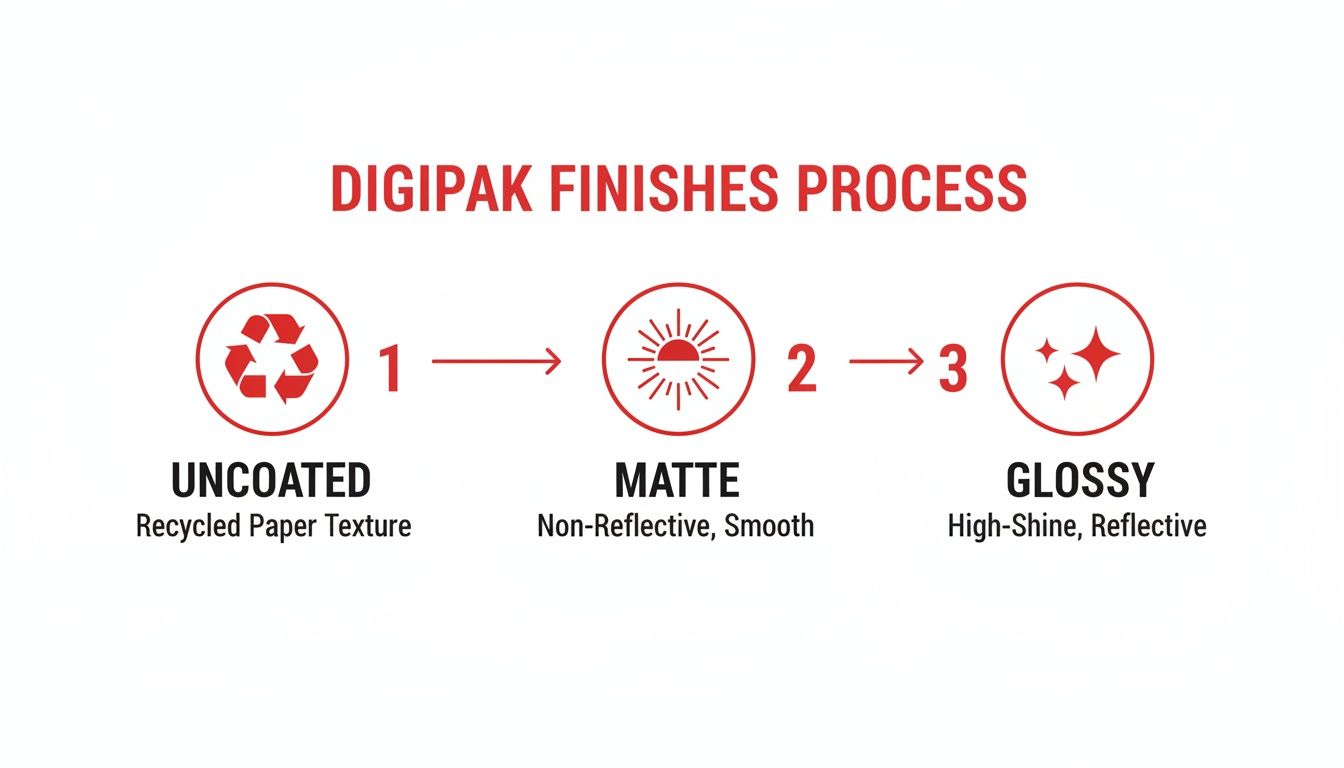
From the raw, natural feel of uncoated stock to the vibrant pop of a glossy finish, each choice creates a totally different vibe for your final package.
After the discs are made—either by duplication or replication—they head over to assembly. Your digipak artwork is printed on huge sheets of paperboard, then precision-cut, folded, and glued into shape. The clear plastic trays are carefully attached inside, and the finished discs are popped in.
Finally, the whole package is shrink-wrapped for that fresh, retail-ready look before being boxed up and shipped out to you.
Getting Your Digipaks to Their Destination Safely
You’ve got a stack of beautiful new CDs—now comes the final, crucial step: getting them into the hands of fans and distributors without a scratch. Smart packaging and shipping choices are what protect your investment and make sure your digipaks arrive looking just as professional as they did when they left the press.
Protecting individual orders really starts with picking the right mailer. While bubble mailers are everywhere, rigid cardboard mailers are a much safer bet. They stop the corners of the digipak from getting bent or crushed in transit, which is probably the most common complaint when using flimsy packaging. For an extra touch of professionalism, you can even shrink-wrap each unit.
How to Pack for Fans vs. Distributors
Packing a single order for a fan is a totally different ballgame than prepping a bulk shipment for a distributor. Each needs its own approach to stay safe and cost-effective.
- For Individual Orders: Use a mailer that fits snugly. If there’s any wiggle room, slide a small piece of cardboard on either side of the digipak to add stiffness. It’s also a nice touch to include a packing slip or a small thank you note to make the experience more personal.
- For Bulk Shipments: When you’re sending a whole box of CDs in digipaks to a retailer, stack them tightly so they can’t shift around. Use bubble wrap or packing paper to fill any empty space in the box. And make sure the box itself is a heavy-duty, corrugated type that can handle being tossed around.
Pro Tip: When packing a box full of digipaks, try arranging them with the spines alternating directions. This little trick helps them stack more evenly and securely, so they’re less likely to slide around and damage each other.
A Quick Guide to Shipping Costs and International Orders
Shipping can get expensive fast, especially when you’re sending orders overseas. You have to calculate postage accurately if you don’t want to lose money on your sales. Use an online shipping calculator and grab a small postal scale to weigh packages right from your studio or home office.
Sending music internationally means dealing with customs forms and different rules. Always be honest when filling out customs declarations—list the item as “Merchandise” and state its true value. Trying to under-declare the value to save a few bucks on duties can get your package seized, and that’s a headache nobody wants.
The global love for physical media is still strong in certain places, with markets like Japan showing a real passion for CDs. At its peak in 2019, Japan produced a staggering 132 million units. Digipaks actually helped reduce manufacturing costs there by 25% because their lighter paperboard construction is cheaper to produce. This lightweight advantage also means lower shipping costs for artists sending their music across the globe.
You can dig deeper into these numbers with global CD marketing statistics at AAMRA and ELMA.
Placing Your Digipak Order With Confidence
Ready to get your project rolling? We’ve designed our process for ordering CDs in digipaks to be totally transparent and easy to follow. You can kick things off without any guesswork. It all starts right on our site with a simple online calculator.
Just pop in your project details—like how many copies you need and whether you’re going for a 4-panel or 6-panel digipak. You’ll get an instant, accurate price quote on the spot. No hidden fees, no surprises down the line. It’s the clearest way to see your investment from the very beginning.
Once that quote looks good to you, it’s time to send us your files. Our secure portal makes uploading your final, print-ready artwork and master audio files a breeze.
The Digital Proofing Stage
After your files land with us, our pre-press team immediately gets to work creating your digital proof. Think of this as a complete mockup of your finished project. We’ll show you exactly how your artwork will look on the printed panels and what the on-disc printing will look like.
This is your final chance to spot any issues. Comb through every detail—check for typos, confirm the image placement is just right, and make sure everything is exactly how you envisioned it. Your approval is what officially sends your project to the presses.
This review step is crucial because it ensures you know precisely what you’re getting. Once you give us the thumbs-up, we move into full production, confident that the final product will match your vision perfectly. It’s a stress-free way to guarantee a result you’ll be proud of.
Common Questions About CDs in Digipaks
When you’re gearing up for a physical release, a few questions about CDs in digipaks always pop up. Getting the lowdown on minimums, timelines, and extras helps you map out your budget and schedule without any last-minute surprises. We’ve pulled together the most common questions we get to give you the info you need.
Sorting out these details from the get-go makes the whole process a lot smoother. It doesn’t matter if you’re a seasoned artist or pressing your very first album—knowing what to expect is key.
What Is the Minimum Order Quantity?
The smallest run you can order really comes down to the manufacturing method you choose. Each one is built for different project sizes and budgets.
- Duplication: This is your go-to for smaller, more nimble projects. You can often order as few as 25 or 50 units, which is perfect for limited edition releases, tour merch, or just testing the waters.
- Replication: Since this process involves creating a glass master disc to stamp out your CDs, it requires a bigger commitment. The minimums here usually start around 300 to 500 units. The trade-off? The cost per CD drops way down when you order in bulk.
How Long Will My Digipak Order Take?
Turnaround time is another big piece of the puzzle you need to fit into your release schedule. As a rule of thumb, replicated orders take a bit longer because the setup is more involved.
A standard duplicated digipak order usually ships out in about 5-10 business days once you give the final thumbs-up on your proofs. On the other hand, replicated orders typically need around 10-15 business days for production. Always build in a little extra time for shipping to make sure you hit your release date without a hitch.
Pro Tip: When you place your order, always ask about the current production schedule. Things can get busy during peak seasons, and turnaround times might stretch a bit. It’s always smart to plan ahead.
Can I Add a Booklet to My Digipak?
You bet! Most digipak styles, especially the classic 4-panel and 6-panel layouts, are designed specifically to hold booklets. This is your space to include lyrics, credits, photos, liner notes—whatever you want to add.
Booklets usually slide right into a dedicated pocket or a vertical slit on one of the panels. It’s an easy way to add a ton of professional polish and give your fans more to dive into.
Ready to bring a professional physical release to life? Mixtape Duplication makes ordering high-quality CDs in digipaks straightforward and budget-friendly.